Editor Settings
Overview
In "Editor settings," you can decide which items to place on the record edit screen and their placement locations. To place items on the record edit screen, item activation is required. Activated items can be configured in more detail through "Advanced settings." Additionally, you can create new "Tabs" and "Headings" to organize items. Note that using "Smart Design" allows you to intuitively add and arrange items with drag operations.
Limitations
- Even if an item is disabled, the "Advanced settings" for that item are retained. When "enabled" again, the retained settings will be restored.
- Even if an item is disabled, data already registered for that item is retained. When "enabled" again, the registered data will be restored.
Prerequisites
- "Site management" authority is required to make settings.
Operation Procedure
1. Opening "Editor settings"
- Please open the target table.
- Select "Manage" -> "Manage table" from the "Navigation menu".
- Open the "Editor" tab.
- "Editor settings" will be displayed.
2. Item Activation
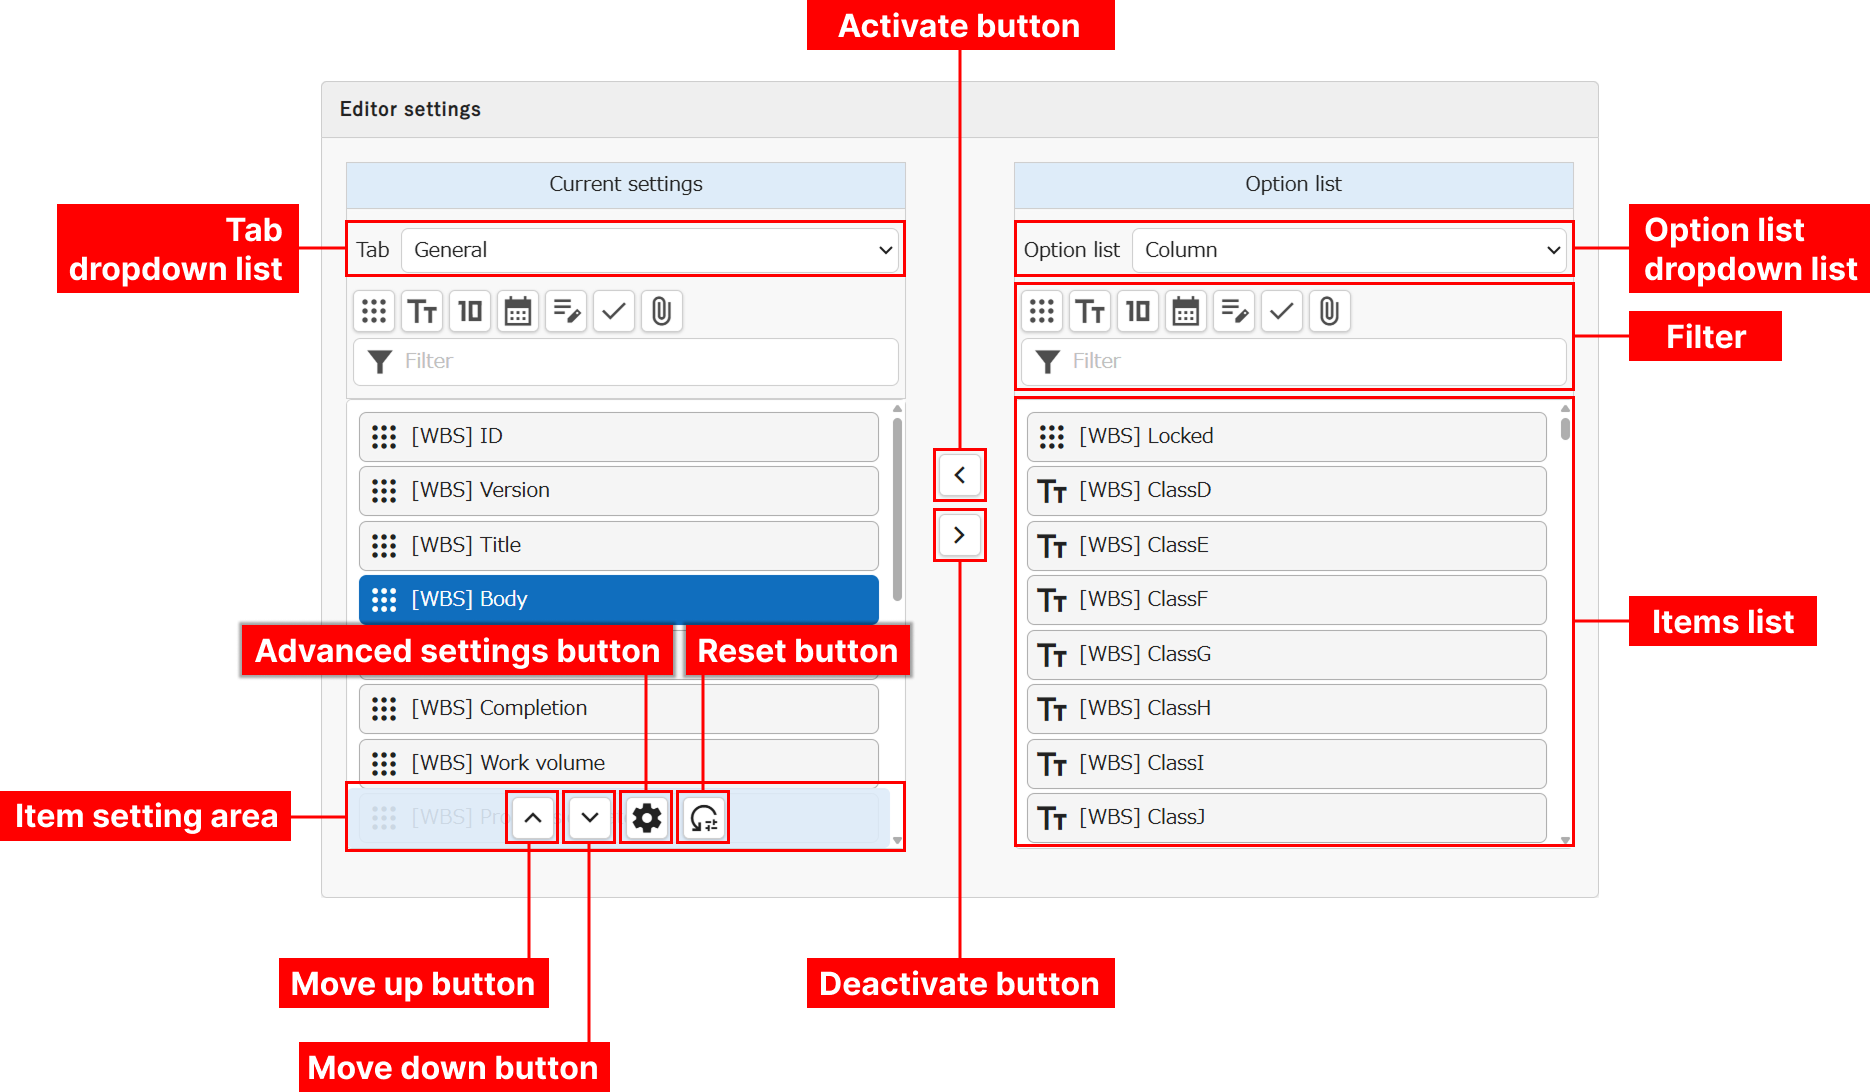
- Please confirm that "Column" is selected in the "Option list" dropdown list.
- From the "Tab" dropdown list, select the tab where the item will be placed.
» This operation is only necessary when tabs have already been created.
» If no tabs have been created, only the "General" tab can be selected. - From the items list in the "Option list", select the item you want to activate.
» You can narrow down the items list display by using the filter functions. - Click the "Activate" button.
» The activated item will be added to the bottom of "Current settings" and the Item setting area will be displayed. - Use the "Move up" button or "Move down" button to adjust the display position.
» The display order in the items list becomes the display order on the record edit screen.
» By clicking the "Move up" button while holding the Ctrl key, you can move the selected items to the top of the items list.
» By clicking the "Move down" button while holding the Ctrl key, you can move the selected items to the bottom of the items list.
» The "Move up" button and "Move down" button are not displayed when using the filter function in "Current settings".
» Clicking a selected item again will deselect it. - Click the "Update" button in the "Command button area".
2.1. Filter
By using filters, you can narrow down the display of the "Items list". Additionally, multiple filters can be specified simultaneously.
| Active | Inactive | Name | Description |
|---|---|---|---|
 |  | "Basic" button | When clicked, displays "Basic items" (items automatically enabled when creating a table). |
 |  | "Class" button | When clicked, displays "Class items". |
 |  | "Numeric value" button | When clicked, displays "Numeric value columns". |
 |  | "Date" button | When clicked, displays "Date columns". |
 |  | "Description" button | When clicked, displays "Description columns". |
 |  | "Check" button | When clicked, displays "Check columns". |
 |  | "Attachment" button | When clicked, displays "Attachments columns". |
 |  | "Filter" text box | You can narrow down the display of the "Option list" and "Current settings" list by "display name" (or its partial string). |
2.2 Item setting area
When you select an item in the "Current settings" items list, a "Item setting area" is displayed at the bottom of the list.

The "Item setting area" displays the following 4 buttons. The "Move up" button and "Move down" button are not displayed when using the filter function in "Current settings".
| Icon | Name | Description |
|---|---|---|
 | "Move up" Button | When clicked, swaps the selected item with the item one position above. When clicked while holding the Ctrl key, moves to the top of the list. Not displayed when using filter function. |
 | "Move down" Button | When clicked, swaps the selected item with the item one position below. When clicked while holding the Ctrl key, moves to the bottom of the list. Not displayed when using filter function. |
 | "Advanced settings" Button | When clicked, displays the "Advanced settings" screen for the selected item. |
 | "Reset" Button | When clicked, resets and disables changes made on the "Advanced settings" screen. Remains disabled even after clicking the Update button. |
3. Operation Procedure (Item Deactivation)
- Select the item you want to deactivate from the "Current settings" item list and click the "Deactivate" button.
- Click the "Update" button in the "Command button area".
4. Operation Procedure (Organizing Activated Items)
To organize activated items (and links that are displayed on the record edit screen like items), you can use the following methods:
For details, please see the respective linked destinations.
Supported versions
| Supported versions | Body |
|---|---|
| 1.1.21.0 or later | Modify the design of "Editor Settings" |
Related Information
- Manage Table: Editor: Column Advanced Settings
- Manage Table: Editor: Tab
- Manage Table: Editor: Heading (Section)
- Smart Design: Overview
- Manage Table: Items: Basic
- Manage Table: Items: Class
- Manage Table: Items: Numeric Value
- Manage Table: Items: Date
- Manage Table: Items: Description
- Manage Table: Items: Check
- Manage Table: Items: Attachments
- Contact
In Case There Are Not Enough items
If 26 items from A to Z such as "Class items", "Numeric value items", "Date items", "Check items", "Description items" are not enough, the number of items can be expanded to 27 or more by using the "Enterprise Edition". For more information on the "Enterprise Edition", please refer to "Here" (Japanese text only). For information on how to obtain a trial version of the "Enterprise Edition", please contact us at "Contact" (Japanese text only).