Setup and Preparation
Overview
This page explains the setup and preparation of Pleasanter Code Assist.
Outline of the Steps
- Install Visual Studio Code
- Install the Pleasanter Code Assist extension
- Create the work folders
- Create the server connection information file
1. Installing Visual Studio Code
Install Visual Studio Code on the client machine you use. Download Visual Studio Code from here.
https://code.visualstudio.com/Download
For how to install it, check the following official site.
https://code.visualstudio.com/docs/setup/setup-overview
2. Installing the Pleasanter Code Assist Extension
- Start Visual Studio Code.
- Click the extensions icon on the view bar in the left pane to open the extensions sidebar.
- Search for Pleasanter Code Assist.
- In the search results, click the Install button.
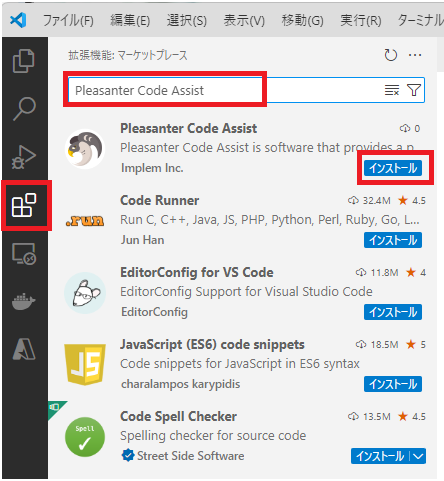
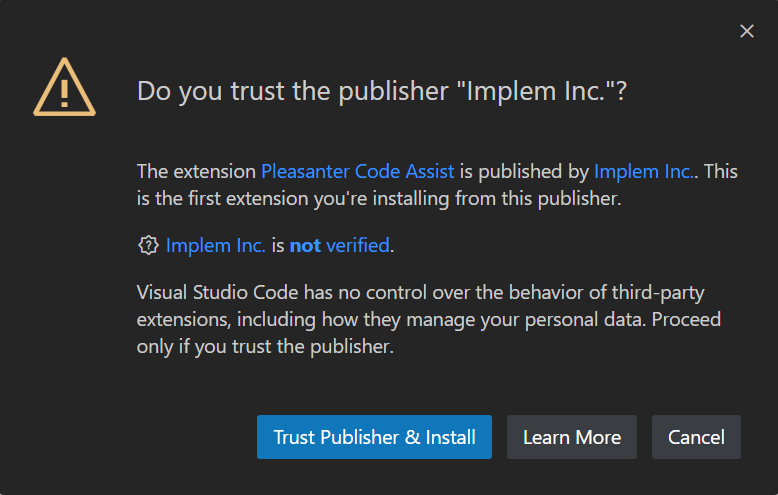
- If a dialog like the following is displayed, click the "Trust Publisher & Install" button.
3. Creating the Work Folders
Run the command for creating the work folders to create them. For the steps, refer to the following page.
Pleasanter Code Assist: Creating a Work Folder by Command
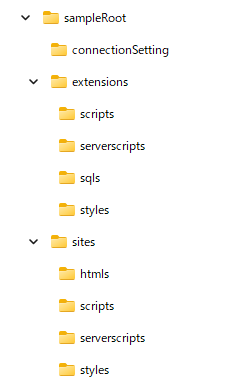
If you create them by hand, take any folder on the machine you use as the "base folder" and create folders under it with the structure shown in the figure below. Create the "base folder" with any name you like. In the figure below, "sampleRoot" is the base folder.
| Folder Name | Description |
|---|---|
| The base folder (sampleRoot in the figure above) | The folder that is the base when you use Pleasanter Code Assist. Its location and name are up to you. You can create several base folders. |
| connectionSetting | Holds the server connection information files |
| extensions | Groups the folders for extended scripts, extended server scripts, extended SQL and extended styles |
| scripts | Holds the definition files and the source code files of extended scripts |
| serverscripts | Holds the definition files and the source code files of extended server scripts |
| sqls | Holds the definition files and the source code files of extended SQL |
| styles | Holds the definition files and the source code files of extended styles |
| sites | Groups the folders for HTML, scripts, server scripts and styles |
| htmls | Holds the source code of HTML |
| scripts | Holds the source code of scripts |
| serverscripts | Holds the source code of server scripts |
| styles | Holds the source code of styles |
With Pleasanter Code Assist 1.3.0 and later, you can create subfolders inside folders such as scripts and serverscripts, and organise and classify the scripts you create.
4. Creating the Server Connection Information File
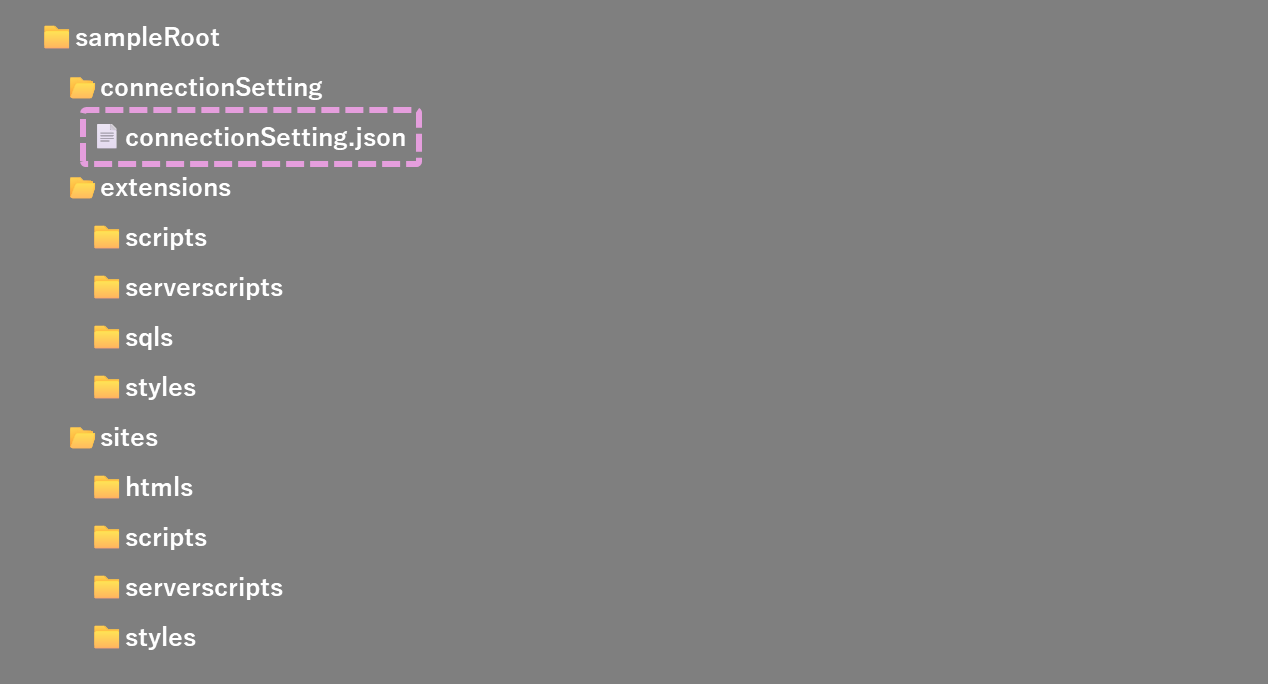
Create a server connection information file in the connectionSettings folder. Create an API key in advance.
File name
Up to you. The extension is ".json". You can create several files.
Setting values
| Parameter Name | Configuration Example | Description |
|---|---|---|
| apiKey | xxxxx... | Set an API key created by a user who has site management permission for the target table |
| url | https://servername | Set the root URL of Pleasanter |
Configuration example
json
Connecting via a proxy server
When you connect via a proxy server, note that how you configure it differs depending on the version.
Ver1.2.0 and later
Set http.proxy and http.proxyAuthorization, which are the default settings of Visual Studio Code.
Up to Ver1.1.0
See the details
Set additional parameters in the server connection information file.
| Parameter Name | Configuration Example | Description |
|---|---|---|
| proxy | JSON | Set this when you connect via a proxy server. It is not needed when you do not use a proxy server (*1) |
| protocol | https | Set the protocol used to connect to the proxy server. Set http or https (*1) |
| host | proxy.servername | Set the server name of the proxy server (*1) |
| port | 8080 | Set the connection port of the proxy server (*1) |