Editor: How to Use
Overview
Smart Design allows you to easily edit the layout of the editor screen by dragging and dropping.
You can also change the display options for each column individually in the dialog.

Limitations
- Only the [General] tab can be edited in Smart Design. Please note that columns placed in the Added tab cannot be edited.
- "Comment" cannot be edited from the Smart Design editor, so if necessary, please set them from Manage Table.
- Please note that the settings of columns ending with A-Z in the "Option List" of Manage Table > Editor will be reset when they are called from Smart Design.
- Please note that the settings of column ending with A-Z will be reset if they are deleted from the editor layout.
- Please also refer to the limitation in "Smart Design: Overview".
Screen Description
Draggable Area

1. Editor Column List
You can place a column on the editor by selecting it on the left side of the screen and dragging and dropping it to the layout area on the right.
Group names of columns are accordion buttons, and by expanding them, the columns that can be placed will be expanded.
Details of each group are as follows.
| Column Group Name | Description |
|---|---|
| Default columns | Basic columns that make up a site. |
| Additional Items | Columns that end with A-Z, such as class/number/date/description/check/attachment. |
| Link Table | If a link is associated with the site, you can place a table of links. |
| Other | You can place "Heading" and the column setting "No Wraparound" as line breaks. |
2. Layout area
The columns placed on the app's editor screen are laid out in card-type units on the right side of the screen.
You can freely rearrange the placed columns cards by dragging and dropping them.
Various column cards
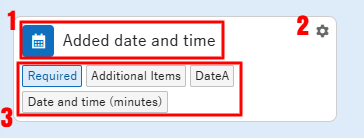
Display configuration of placed column cards.
| No | Tag | Description |
|---|---|---|
| 1 | Name Displayed | Display name of placed column. |
| 2 | Edit button | Button that displays an edit dialog to change column settings. |
| 3 | Tag | Displays option values for some settings. For details, see the tag list below. |
Tag list
| Tag | Description |
|---|---|
| Required | Displayed if "Required" is checked |
| Read-only | Displayed if "Read only" is checked |
| Column group | Group name belonging to the list on the right side of the screen |
| Column name | Original column name of the column. [Title], [Category A], etc. |
| Control type | Control type value of class columns (drop-down list/radio button) and numeric value columns (spinner) |
| Markdown | Displayed if the description column style is "Markdown" |
| Rich text editor | Displayed if the description column style is "Rich text editor" |
| Date format | Editor format value of date column |
| Destination site ID | Destination site ID linked to the link table |
| Source site ID | Source site ID linked to the link table |
Column edit dialog
You can call up the edit dialog from the edit button (2) on the column card to change settings or delete the column you placed.

The following is the display configuration of the column editing dialog.
| No | Tag | Description |
|---|---|---|
| 1 | Header | Displays the original column name of the column. |
| 2 | Settings area | You can edit the column settings. |
| 3 | Simple preview | You can preview the input form UI in real time with the edited contents. |
| 4 | Close button | Closes the editing dialog |
| 5 | Update button | Updates the column card with the edited contents. |
| 6 | Delete button | Deletes the selected column card from the layout. |
Operation Method
Place and sort columns
When Smart Design is launched, the current Manage Table > "Editor" configuration is displayed.

You can place the necessary columns in the editor by dropping them from the column list on the left side of the screen, and you can freely rearrange the columns already placed, so you can intuitively design the layout of the editor screen.
Notes on placing additional columns
Please note that if you place an additional column whose settings have been previously changed in the layout area, the changes will be reset.
Edit columns
You can call up the column editing dialog by clicking the edit button on the placed column card.

In the dialog, you can change the settings while checking a simple preview.
The changes will be reflected in the column card when you press the "Update" button.
Delete column from layout
If you want to delete a column card from the layout, you can do so by clicking the "Delete" button under the edit dialog.

Columns in "Basic columns/Link tables" will be returned to the column list while retaining their settings, and settings in "Additional columns/Other" columns will be reset.
Notes on placing additional columns
Please note that if you delete a class column linked to a link, the link table will also be deleted.
Types Of Columns That Can Be Set
| Name | Overview | Notes |
|---|---|---|
| ID | A column that stores the unique ID of the "Record". Read-only | Default setting for time-limited tables and record tables |
| Version | A column that stores the version number of the "Record". Read-only | Default setting for time-limited tables and record tables |
| Title | An "Input column" that stores the "Title" to identify the "Record". | Default setting for time-limited tables and record tables |
| Body | An "Input column" where you can enter the content of the "Record" as free text. You can use Markdown and Rich text editor to enter text and register Image. | Set as default in deadline tables and record tables |
| Start | An "Input column" that stores the "Start date and time" of the "Record" | Set as default in deadline tables, cannot be set in record tables |
| Complete | An "Input column" that stores the "Completion date and time" that indicates the deadline of the "Record" | Set as default in deadline tables, cannot be set in record tables |
| Work | An "Input column" that stores the "Work volume" of the "Record" | Set as default in deadline tables, cannot be set in record tables |
| Progress | An "Input column" that stores the "Progress rate" of the "Record" as a percentage between 0 and 100% | Set as default in deadline tables, cannot be set in record tables |
| Remaining work | A column that automatically calculates the "Remaining work volume" from the "Work volume" and "Progress rate" of the "Record". Read-only | Default setting in time-limited tables, cannot be set in record tables |
| Status | An "Input column" that stores the status of the "Record" | Default setting in time-limited tables and record tables |
| Administrator | An "Input column" that stores the administrator of the "Record" | Default setting in time-limited tables and record tables |
| Person in charge | An "Input column" that stores the person in charge of the "Record" | Default setting in time-limited tables and record tables |
| Lock | An "Input column" for "Lock Record" | Default setting in time-limited tables and record tables |
| Category | An "Input column" that can be selected from a list of options or in free text format | |
| Number | An "Input column" that allows you to enter numbers as free text | |
| Date | An "Input column" that allows you to enter date and time from free text or the calendar | |
| Description | An "Input column" that allows you to enter a string as free text. You can use Markdown and Rich text editor to enter text and register Image. | |
| Check | Checkbox "Input column" | |
| Attachments | "Input column" where you can upload/download Attachment. | |
| Link table | Table of links associated with the site. | Hidden if no links are set. |
| Heading | Heading column to organize the editor layout. | Can be edited in the details modal. |
| Line break | Details setting "No Wraparound" is treated as a line break. |
Supported Versions
| Supported versions | Body |
|---|---|
| 1.4.15.0 or later | Added function |
| 1.4.20.0 or later | Added Rich text editor |
Related Information
- Added tab
- Manage Table: Items: Comments
- Manage Table: Editor: Column Advanced Settings: Option List
- Manage Table: Editor: Heading (Section)
- Manage Table: Editor: Column Advanced Settings: No Wraparound
- Manage Table: Editor: Column Advanced Settings: Input Required
- Manage Table: Editor: Column Advanced Settings: Read-only
- Common Function: Markdown
- Common Function: Rich text editor
- Manage Table: Editor
- Tenant Management Function: Logo, Title, Logo Image
- Table Function: Register Image to Record
- Table Function: Lock Record
- Table Function: Download Record Attachments