Manage Table: Editor: Column Advanced Settings: Title Combination
## Overview
This explains how to combine multiple columns and treat them as a title.
## Prerequisites
1. "Site Administration Permission" is required to configure settings.
## Operation Procedure
For example, take the case of creating an application for customer management.
If you have a customer list like the one below, there is a possibility that customer names will be duplicated.

For example, if you want to use a customer list as master data by linking it to other tables, if customer names are duplicated, it will be impossible to distinguish which is which.

As a countermeasure for such cases, a method to manage them by assigning a unique code (a number or character string that identifies a customer) is generally used.
In the diagram below, there are two companies with the same name, Assist Co., Ltd., but they are managed as a set with different customer CDs of 10100 and 30300, which ensures uniqueness.

To ensure the uniqueness of title columns (duplicate values are not prohibited by default), Pleasanter has a function called Title Combination that combines multiple columns and treats them as a title.
Open the table for which you want to set the title combination, open "Manage" → "[Manage Table](/en/manual/table-management)" → "[Editor](/en/manual/table-management-editor)" from the navigation menu, select "Customer Name" from the "Current Settings" column (for convenience of explanation, the column name is (title)), and click "Advanced Settings".

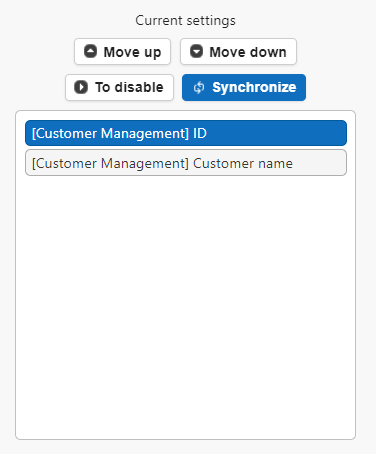
Select "Customer CD" from the list of option and "Enable", then rearrange it from top to bottom as "Customer CD" and "Customer Name" as shown below.
If data is already entered, click the "Synchronize" button to recreate the titles of all data in the table according to the settings.
Change the "Title Separator" that separates each column if necessary.
**Caution!! Do not use (comma) as the "Title Joiner".**
Click the "Update" button to return to the list screen.

When the settings are complete, it will be displayed in the format "Customer CD) Customer Name" as shown below.

The character separating the customer CD and the customer name, in this case ")", can be set in the "Title Separator" on the details screen mentioned earlier.
---
## Ensure uniqueness when there is no customer CD, etc. for identification
In Pleasanter, each record is assigned a unique ID. Therefore, when there is no specified code, etc., you can ensure uniqueness by combining it with the ID as shown below.


---
## If you set (update) a title join when data already exists.

Click the "Synchronize" button to apply the settings to all data in the table and synchronize them.
If the title does not change after changing the settings, please perform the "Synchronize" process.
## Related Information
<div id="ManualList"><ul><li><a href="/en/manual/table-management">Manage Table</a><span>12.09.2025 up</span></li></ul></article>
<ul><li><a href="/en/manual/table-management-editor">Manage Table: Editor</a><span>12.09.2025 up</span></li></ul></article></div><input id="SearchTextHidden" type="hidden" value="" />
