Table Function: Site Integration
## What Is Site Integration?
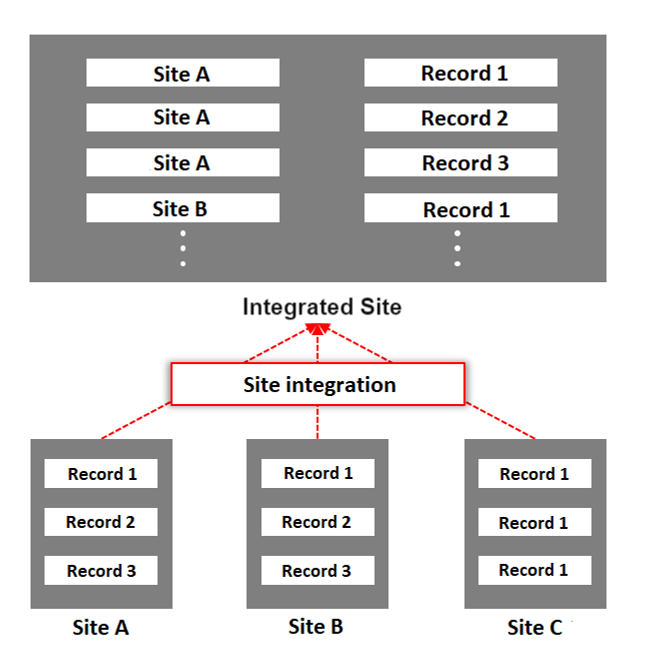
This function displays records from multiple tables together.
It can be used on the list screen and each view mode screen. Clicking on a record in the merged table will display the record in the source table. It can be used with the time-limited table or recorded table.
The time-limited table and recorded table cannot be mixed.

## Limitations
1. The recycle bin of a table where sites have been integrated will display data from other tables that have been integrated, but data that is not registered in the table from which the recycle bin is displayed cannot be restored or deleted from the recycle bin. If you want to restore or delete from the trash, please do so from the trash can of the table where the data is originally registered. In addition, to delete table data in bulk, data from other tables can be deleted from the site where the sites have been integrated.
## Set Site Integration
1. Create an integrated site. Create a new site or create one by copying the source site.
1. Set up the source site to be associated with the integrated site. Open the "Site Integration" tab in the "[Manage Table](/en/manual/table-management)" of the integrated site, and specify the ID of the source site in the "Site ID" field, separated by a comma. Check the site ID on the "[Manage Table](/en/manual/table-management)" screen of the source site.
1. You can combine the class column of each source site on the integrated site. For example, if the source site A has the options A, B, and C in category A, and the source site B has the options D, E, and F in category A, it is possible to treat A, B, C, D, E, and F as options in category A of the integrated site. The settings are made from the "[Manage Table](/en/manual/table-management)" of the integrated site. Open the detailed settings of the target category column in the "[Manage Table](/en/manual/table-management)" and "Editor" tabs. Next, enter [[Integration]] in the list of options.
## Steps to Display the "Site" Column on the Screen Index after Site Integration
1. Use steps 1. to 2. in "Site Integration Settings" above to integrate multiple tables.
1. Open the "[Index](/en/manual/table-management-grid)" tab of the "[Manage Table](/en/manual/table-management)" of the integrated site and enable the "Site" column.
1. Click the "Advanced Settings" button with the "Site" column selected as necessary to customize the settings.
1. Click the "Update" button.
1. The "Site" column on the screen index displays the name of the table in which each data is registered.
## Steps for Using the "Site" Filter Column after Integrating Sites
1. Use steps 1 to 2 in "Set Site Integration" above to integrate multiple tables.
1. Open the "[Filter](/en/manual/table-management-filter)" tab in "[Manage Table](/en/manual/table-management)" for the integrated site and enable the "Site" column.
1. With the "Site" column selected as necessary, click the "Advanced Settings" button to customize the settings.
1. Click the "Update" button.
1. Open the screen index and use the "Site" filter column to narrow down the data by registered tables.
