Manage Table: Editor: Column Advanced Settings: Option List: Link
## Overview
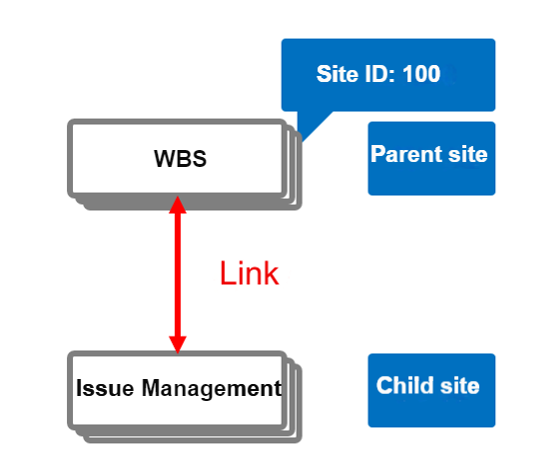
You can set parent-child relationships between tables. Titles of records managed in the parent table can be displayed as a dropdown menu in the class columns of the child table. When a parent-child relationship is set between time-limited tables or recorded tables, a button to create a child record appears on the editor screen of the parent table. Creating a child record from this button establishes a mutual link on both the parent and child editor screens. The columns displayed in the mutual link list can be customized via manage table. When setting a Wiki as the parent table, the content described in the Wiki can be displayed in the class columns. This can be set by specifying the site ID of the parent table in the class columns of the child table's manage table. Additionally, if you specify the site ID of your own table, you can create a hierarchical structure within the table.
## Limitations
1. Cannot be used for anything other than "[Class Column](/en/manual/table-management-class)".
## Prerequisites
1. "Site Administration Permission" is required to configure settings.
## Operation Procedure
These are the steps to set up a parent-child relationship between tables. As an example, we have prepared a "WBS" table and an "Issue Management" table. The "WBS" table will be the parent, and the "Issue Management" table will be the child. There are two ways to set up the link: "Drag and Drop" and "[Table Management](/en/manual/table-management)".

## How to Set Up Using Drag and Drop
You can link tables by dragging and dropping. This operation requires "Site Administration Permission".
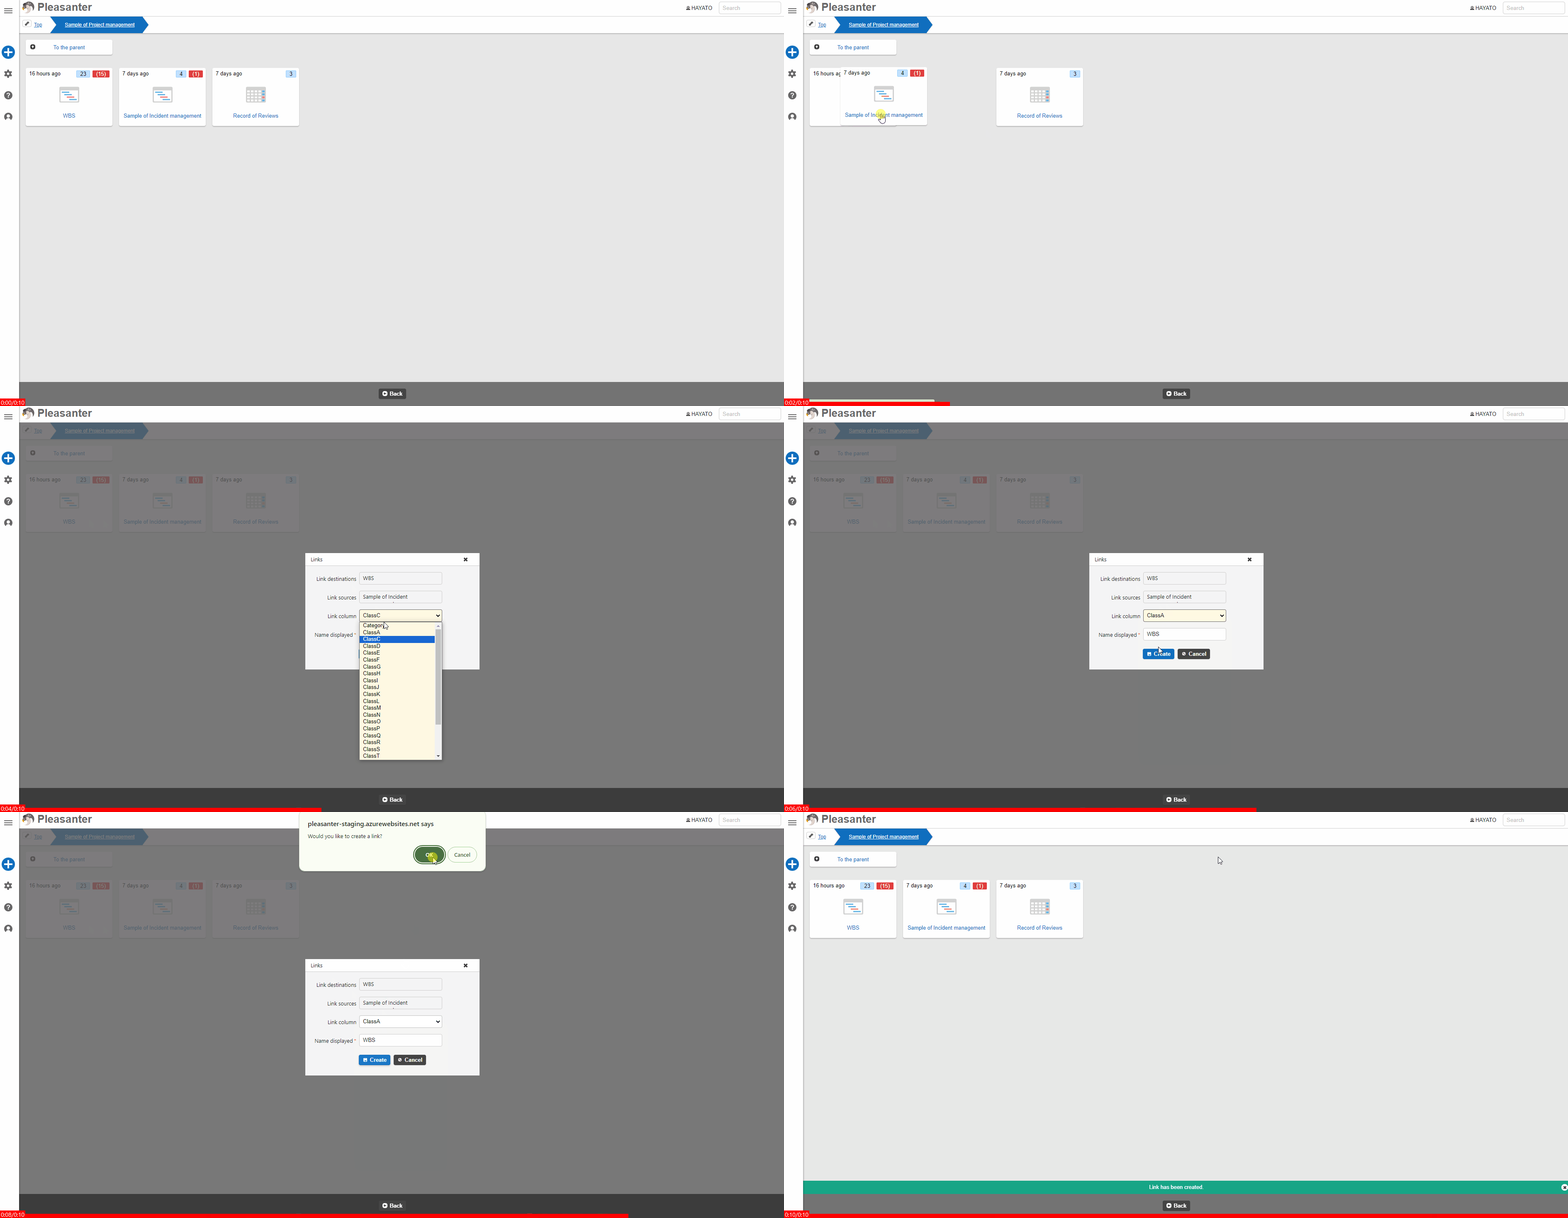
1. In the site menu, drag the "Issue Management" table, which will be the child table, and drop it onto the "WBS" table, which will be the parent table.
1. A popup will appear for setting up the link. Set the class column and name displayed of the child table for the link, then click the "Create Button".
1. A popup will appear to confirm the creation of the link. Click the "OK" button.
1. When the message "Link creation completed." appears, the setup is finished.

## How to Set Up Using Table Management
You can link tables by site ID. This operation requires "Site Administration Permission".
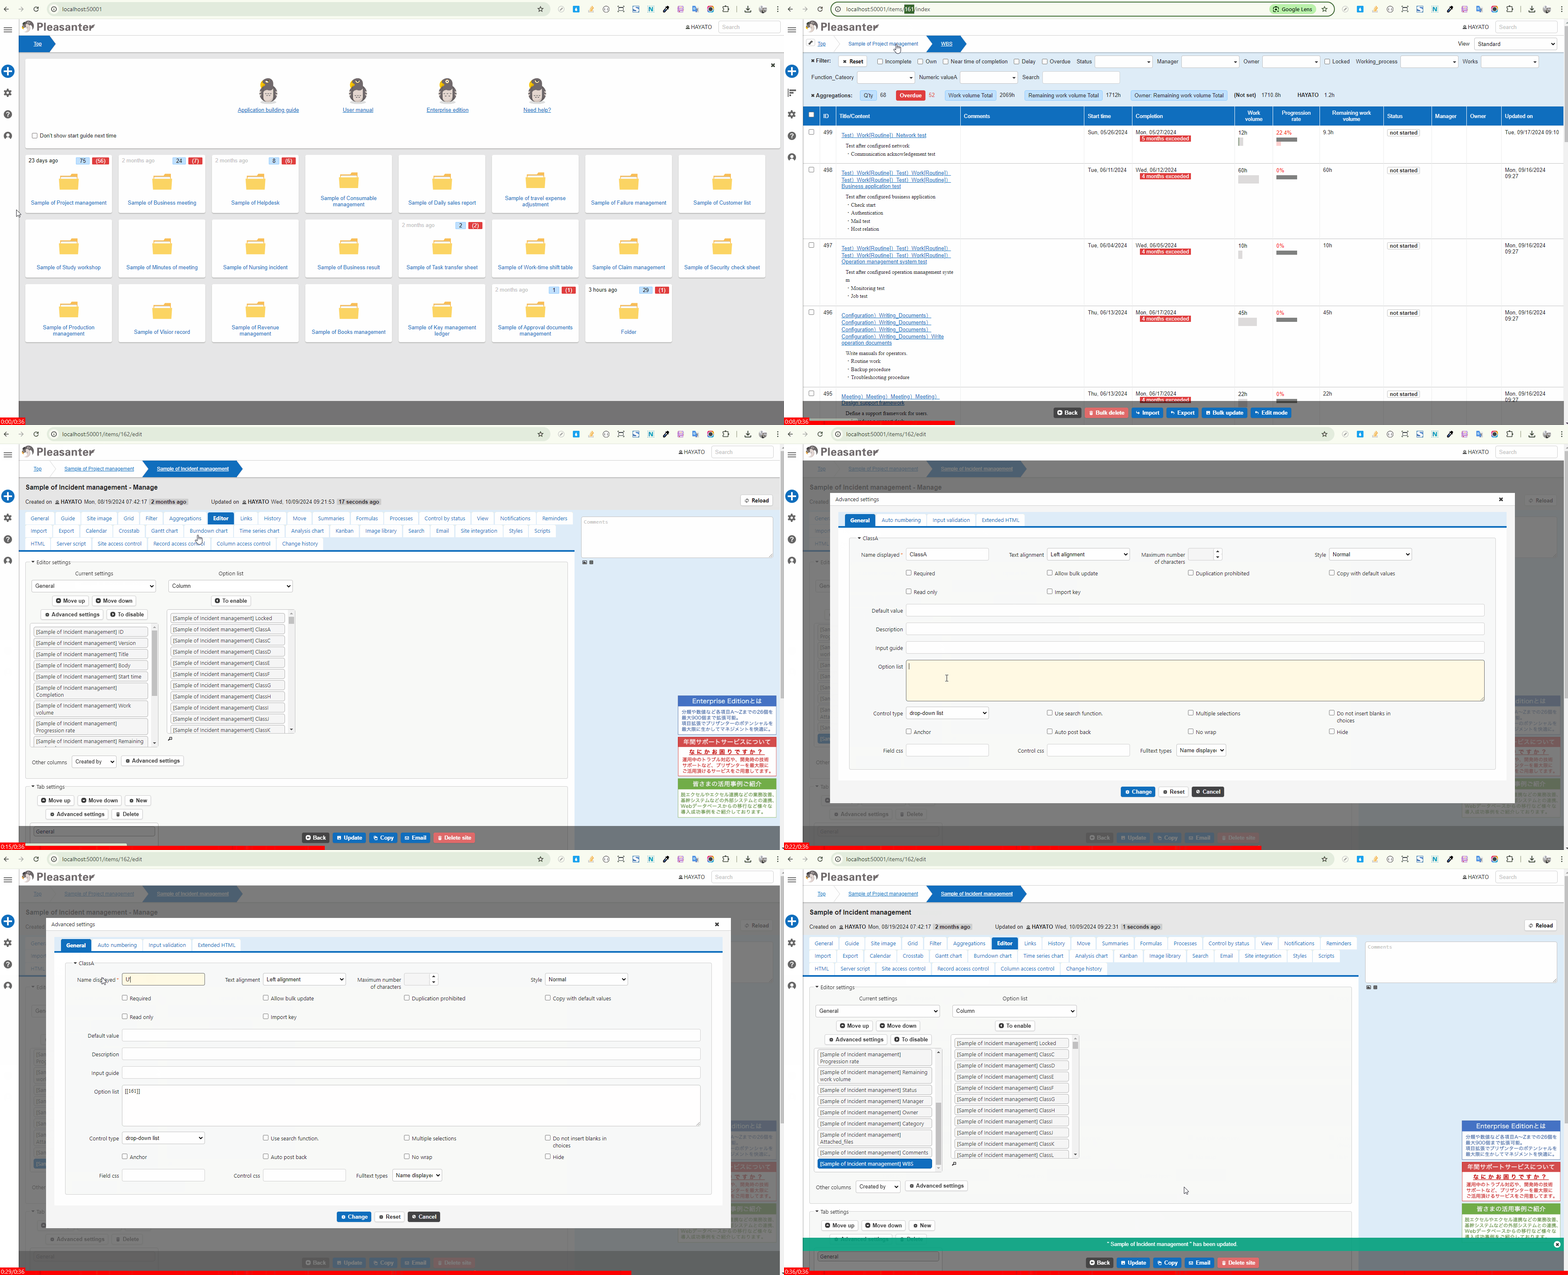
1. Open the list screen of the "WBS" table and note the site ID displayed in the URL.
1. Open the "Issue Management" table and click Manage > Table Management.
1. Select the "[Editor](/en/manual/table-management-editor)" tab and enable any class column from the "[Option List](/en/manual/table-management-choices-text)".
1. Select the class column displayed in "Current Settings" and click the Advanced Settings button.
1. Enter the previously noted site ID in the "[Option List](/en/manual/table-management-choices-text)" and enclose it in double square brackets. Then click the "Update" button.
```
Example of description with double square brackets
[[100]]
```
1. Click the "Update" button in the command button area.

## How to Set Up Columns in the Linked Records List
You can change the columns in the linked records list. This operation requires "Site Administration Permission".
1. Open the target table.
1. Click "[Table Management](/en/manual/table-management)" from the "Manage" menu.
1. Open the "「Link」" tab.
1. Set the settings according to the table below.
|Column name|Description|Setting method|
|:---|:---|:---|
|Current Settings|Columns to display on the link screen|Reorder or disable any column|
|Option List|Columns that can be displayed on the link screen|Enable any column|
1. Click the "Update" button in the command button area.
## How to Hide the "Create Linked Columns" Button
When a link is set between tables, you can hide the "Create Linked Columns" button displayed on the parent table. This operation requires "Site Administration Permission".
1. Open the child table that has been linked.
1. Click "Manage" - "[Table Management](/en/manual/table-management)" from the navigation menu.
1. Select the "[Editor](/en/manual/table-management-editor)" tab, select the class column with the current link, and click the Advanced Settings button.
1. Add NoAddButton after the site ID in the "[Option List](/en/manual/table-management-choices-text)".
```
Example of NoAddButton description
[[100,NoAddButton]]
```
1. Click the "Update" button in the command button area.
## How to Set the Default View for Linked Lists
By combining with the [View Function](/manual/table-record-view), you can apply the list columns, filters, and sorts specified in the view to the list of links displayed on the editor screen. Please set [View Settings](/manual/table-record-view) on the child table as a preliminary step. The settings made in the "[Index](/en/manual/table-management-grid)", "[Filter](/en/manual/table-management-filter)" and "[Sort](/en/manual/table-record-sort)" tabs can be used. This operation requires "Site Administration Permission".
1. Open the child table that has been linked.
1. Click "Manage" > "[Table Management](/en/manual/table-management)" from the navigation menu.
1. Select the "Grid" tab and select the view to apply to the list of links in "[Default View](/en/manual/table-management-default-view)".
1. Click the "Update" button in the command button area.
## How to Set the Maximum Number of Columns to Retrieve for Linked Class Columns
To prevent performance degradation, an upper limit is set for the number of records in the linked destination.
To change the upper limit, specify it in General.json's DropDownSearchPageSize. The default value is 500 records.
Enable the search feature if there are more records than the upper limit.
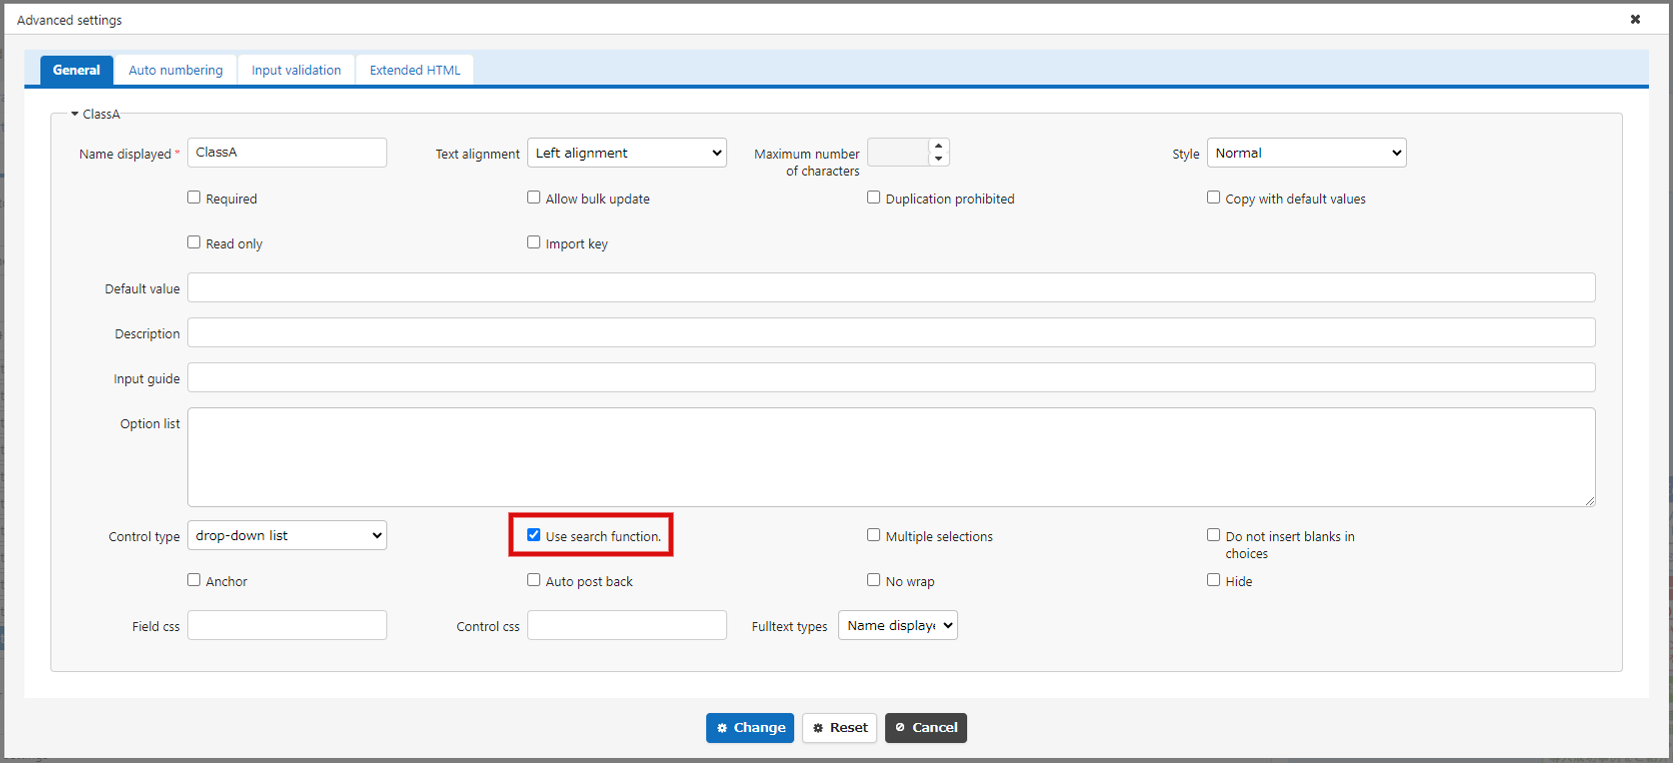
To enable the search function, set it as follows.
1. Open Table Management.
2. Open the Editor tab.
3. Open the Advanced Settings of the target column.
4. Check "[Use Search Function](/en/manual/table-management-use-search)" and click the Change button.

## How to Remove a Link
A link that has been set can be removed by following the steps below.
1. Open the child table.
1. Click Manage > "[Table Management](/en/manual/table-management)" from the navigation menu.
1. Select the "Editor" tab in the management screen.
1. Open the Advanced Settings of the column where the link is set, and delete the [[999]] notation from the options to unlink. (999 is the site ID of the parent).
1. Click the "Update" button in the command button area.
## How to Control the Display Order of Link Information in the Link Table Area
You can control the display order of link information shown on the parent record's edit screen. The display order of buttons to create child table records in "Create Linked Columns" can also be controlled.
1. Open the child table that has been linked.
1. Click Manage > "[Table Management](/en/manual/table-management)" from the navigation menu.
1. Select the "[Editor](/en/manual/table-management-editor)" tab, choose the class column where the link is set, and click the Advanced Settings button.
1. Enter the following JSON content in the "Option List" and click the Change button.
1. Click the "Update" button in the command button area.
### JSON
Specify the site ID of the parent site in "SiteId" and the priority (numerical value) in "Priority".
```
[
{
"SiteId": 123,
"Priority": 100
}
]
```
### Example Settings
The following example assumes the table structure as below:
・Parent Table
Site name: Customer Master
Site ID: 123
・Child Table 1
Site name: Negotiation
Site ID: 456
・Child Table 2
Site name: Contact Master
Site ID: 789
#### Default ("Priority" not set)

#### With "Priority" set in the class columns of Owner Master
When the above JSON content is set in the class columns of Owner Master, it will be displayed as follows. The link information with "Priority" set will be displayed first.

#### With "Priority" specified in the class columns of both Negotiation and Owner Master
When the "Priority" in the class columns of Negotiation is set to 100 and that of Owner Master is set to 200, it will be displayed as follows. The link information with the smaller "Priority" value will be displayed first.

## Related Information
<div id="ManualList"><ul><li><a href="/en/manual/table-record-sort">Table Function: Sort Records (Sort)</a><span>10.07.2024 up</span></li></ul></article>
<ul><li><a href="/en/manual/table-management">Manage Table</a><span>12.09.2025 up</span></li></ul></article>
<ul><li><a href="/en/manual/table-management-class">Manage Table: Items: Class</a><span>12.09.2025 up</span></li></ul></article>
<ul><li><a href="/en/manual/table-management-editor">Manage Table: Editor</a><span>12.09.2025 up</span></li>
<li><a href="/en/manual/table-management-choices-text">Manage Table: Editor: Column Advanced Settings: Option List</a><span>11.27.2025 up</span></li>
<li><a href="/en/manual/table-management-choice-json">Manage Table: Editor: Column Advanced Settings: Option List: Filter, Sort, Display Format</a><span>10.02.2024 up</span></li>
<li><a href="/en/manual/table-management-use-search">Table Management: Editor: Item Detail Settings: Use Search function</a><span>08.13.2024 up</span></li></ul></article>
<ul><li><a href="/en/manual/table-management-grid">Manage Table: Screen Index</a><span>08.13.2025 up</span></li>
<li><a href="/en/manual/table-management-default-view">Manage Table: Screen Index: Default View</a><span>05.16.2025 up</span></li></ul></article>
<ul><li><a href="/en/manual/table-management-filter">Manage Table: Filter</a><span>10.02.2024 up</span></li></ul></article></div><input id="SearchTextHidden" type="hidden" value="" />
