Table Function: Importing Records
## Overview
This is an example of importing data from a simple employee list managed in Excel so that it can be managed in Pleasanter.
In Pleasanter 1.3.11.2 and later, it is now possible to import data by specifying key fields.
[Table Function: Specifying Key Fields When Importing](/manual/table-record-import-key)
## Operation Procedure
The general procedure is as follows.
1. Open the employee list Excel data, select "Save As", select "CSV (Comma Separated Values) (.csv)" or "CSV UTF-8 (Comma Separated Values) (.csv)" as the file format, and save it.
1. Create a recorded table for "Employee list".
1. Set columns in "Editor".
1. Import "Employee list.csv".
1. Set the display columns on the list screen in "「List」".
**[Notes]
・The title of the CSV data to be imported (first line of the CSV data) must match the column name in Pleasanter.**
(Please match the column names displayed in the "[Editor](/en/manual/table-management-editor)" instead of "[Manage Table](/en/manual/table-management)" - "「List」")
**・For time-limited tables, the "Complete" column is required.**
(For recorded table, there are no required columns)
**When importing date data in year-month-day format, please use 4 digits for the year (yyyy-mm-dd).**
If the year is 2 digits, it cannot be imported correctly due to specifications.
### Import Procedure
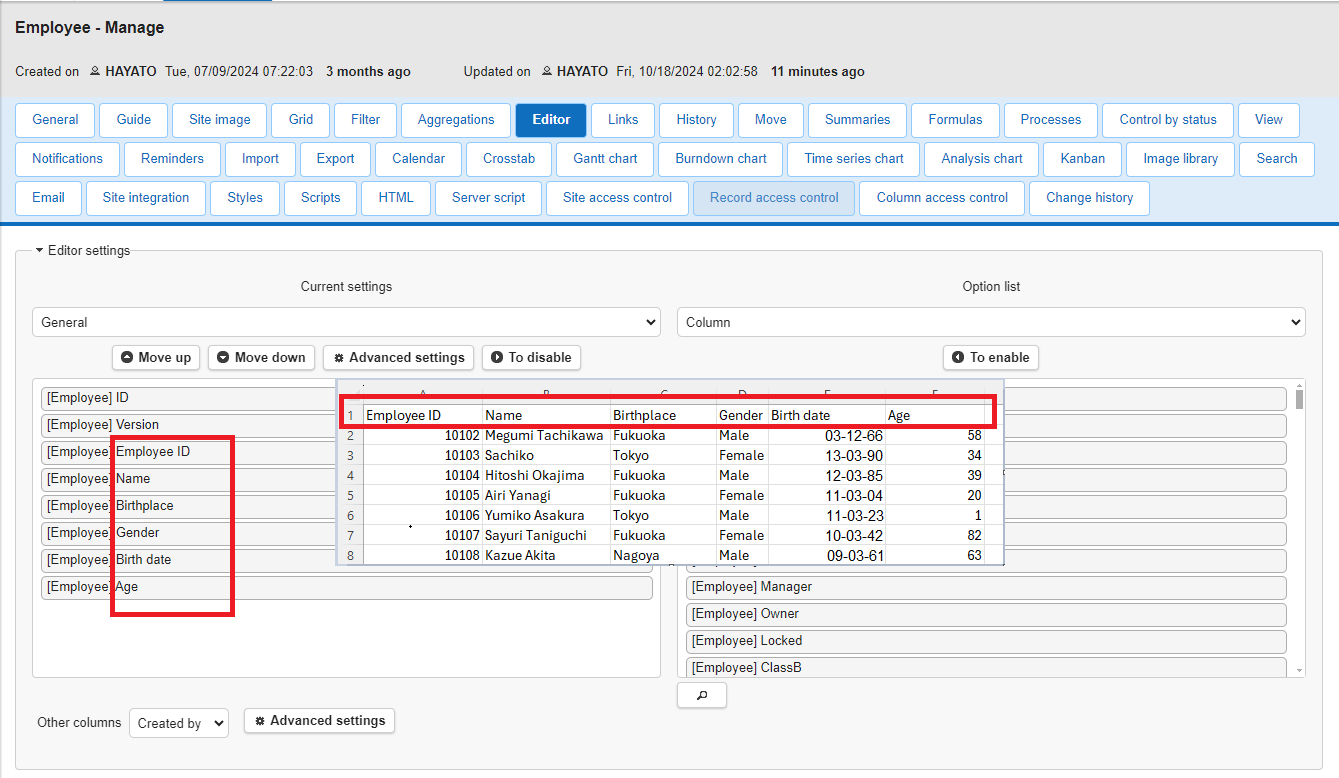
We will explain the following Excel data configuration as an example.

Select the "Manage" - "[Manage Table](/en/manual/table-management)" - "[Editor](/en/manual/table-management-editor)" tab.
Due to the specifications of Pleasanter, "ID" and "Version" cannot be disabled, so leave these two columns and disable the others, then enable each column as follows.
[Pleasanter "[Editor](/en/manual/table-management-editor)" setting screen]

Change the settings for the enabled columns as follows. Select the enabled columns and click the "Advanced Settings" button to set each column.
Column name|Data type|Pleasanter column|Setting column
---|---|---|---
Employee ID|String|DescriptionA|Style: Normal
Name|String|Title
Birthplace|String|DescriptionB|Style: Normal
Gender|String|CategoryA|Options list: Male (Line break) Female
Birth date|Date|DateA
Age|Numerical value|NumA
The contents of the "Gender" category A option list are set as follows.

[Editor screen after setting column names]

When importing data into Pleasanter, the column names in the original data (CSV) must match the column names in Pleasanter.
Please set the column names on the Pleasanter side in "[Editor](/en/manual/table-management-editor)" rather than "[Grid](/en/manual/table-management-grid)".

Please be careful not to confuse the Column Type and Column Name in Pleasanter.
Once you have finished setting the columns, click "Update" to return to the list screen and click the "「Import」" button.
When the dialog box appears, select the CSV file to import.
Select the character code for the corresponding CSV file and click the "「Import」" button.
**[Notes]
Check whether the CSV data you want to import is saved in Shift-JIS or UTF-8 format, and select the saved format in the "Character Code" field displayed in the Pleasanter import dialog box below.**

When the import is completed, it will be displayed on the list screen as shown below.

Next, set the list screen to display the same content as when it was managed in Excel.
Select the "Manage" - "[Manage Table](/en/manual/table-management)" - "[Grid](/en/manual/table-management-grid)" tab.
The default settings are as follows.
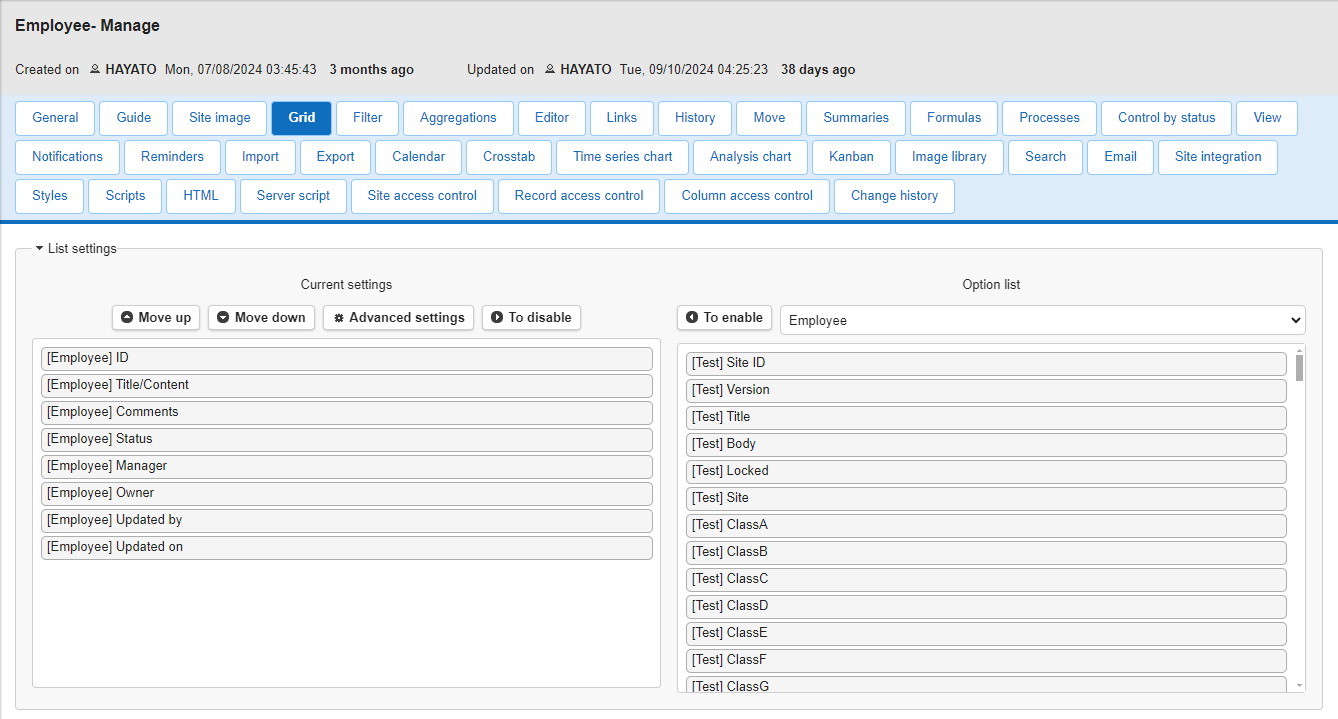
Set it to display all the columns imported this time as follows.
For this data example, enable the following columns. (All others will be disabled.)
* Employee ID
* Name
* Birthplace
* Gender
* Date of birth
* Age
After activating the columns, click the "Update" button, then click "Back" to display the list screen.

The list will look like the original Excel data.

You have now transferred the Excel data to Pleasanter.
## Things to check if the import does not go well
・Data cannot be imported, or only part of it has been imported ……
**→Check that the column name set in "Editor", not "Manage Table" - "Grid", matches the title of the CSV data.**

**→Check that the character code is selected correctly when importing.**

If you can import alphanumeric characters but cannot import Japanese, the character code may be incorrect, so if this does not work, try the other one.
**→For time-limited tables, a value is required for the "Complete" column.**
When importing data into a time-limited table, be sure to enter a value in the "Complete" column.
*There is no "Complete" column for recorded tables.
**→At pleasanter.net, the number of records that can be imported in one import process is 10,000 rows.**
If you want to import more than 10,000 rows of data, please import them in groups of 10,000 rows.
**→Some columns will not be imported even if values are set in the CSV file.**
See the table below for details.
|Column name|When adding a record|When updating a record|
|:---:|:---|:---|
|ID|Automatic numbering by Pleasanter|Do not update|
|Version|Automatic numbering by Pleasanter|Automatic numbering by Pleasanter|
|Creator|User who performed the import operation|Do not update|
|Created date and time|Date and time of import operation|Do not update|
|Updater|User who performed the import operation|User who performed the import operation|
|Update date and time|Date and time of import operation|Date and time of import operation|
|Comment|Value in CSV file *1|In case of JSON format, update by washing method<br>In case of string format, Do not update|
*1 It is possible to import in JSON format data layout values. See 「JSON Data Layout: Comment」 for details.
## Supported Versions
|Supported Versions|Body|
|:--|:--|
|1.4.18.0 and later|Added the ability to update comments when updating records in CSV import|
## Related Information
<div id="ManualList"><ul><li><a href="/en/manual/table-record-import-migrate-mode">Table Function: Importing Records in Migration Mode</a><span>07.28.2025 up</span></li></ul></article>
<ul><li><a href="/en/manual/table-management">Manage Table</a><span>12.09.2025 up</span></li></ul></article>
<ul><li><a href="/en/manual/table-management-editor">Manage Table: Editor</a><span>12.09.2025 up</span></li></ul></article>
<ul><li><a href="/en/manual/table-management-grid">Manage Table: Screen Index</a><span>08.13.2025 up</span></li></ul></article></div><input id="SearchTextHidden" type="hidden" value="" />